DIY high-end speaker cable

Time required: about 30 minutes … 4 hours depending on how well insulation from the wires can be removed.
High-end speaker cables do not have to be expensive. You can assemble a very good cable from relatively low-cost ribbon cable that achieves technical parameters surpassing even the most high-end cables. [1]
In my case I used a cable in which the wires were already twisted together in pairs. This reduces the very low inductance even more.
The cable reel I bought for only a few € at ebay.
| Advantages of these cables | Disadvantages |
|---|---|
Excellent electrical values:
inexpensive |
Withstand voltage is not so high, therefore not suitable for high powers Fabrication is time-consuming (about 2 hours) |
Technical data of the cable
Here is an estimation because lack of high-resolution measurement technique.
Type of ribbon cable: Hitachi 20048 from Cable Hitachi Manchester
| Property | Value per lead | Value in parallel (n leads) |
Value with n = 34 | Comparative data of Professional cable H*S |
|---|---|---|---|---|
| Number of leads | 34 × AWG 7/40 | 2×3 strands of Teflon | ||
| Material | Copper, tin plated | OFC copper 2 × 2,85 mm2 | ||
| Isolation | PVC | PU | ||
| Resistance | 0,6 mOhm/m | divides by n/2 | ~0,037 mOhm/m | 14,2 mOhm/m |
| Inductance | 0,6 µH/m (Estimated) |
divides by n | ~18 nH/m | 164 nH/m |
| Capacity | 41 pF/m | multiplies by n | 1,4 nF/m | 466,0 pF/m |
| Umax | 150 V | 150 V | ||
| Imax | ? | multiplies by n/2 | ||
| Price | about 20 Euros | 304 Euro per 2 m |
Suggestions for improvement:
- Use textile tape instead of using normal adhesive tape
- Crimp the wire ends instead of soldering
Step-by-step guide
 |
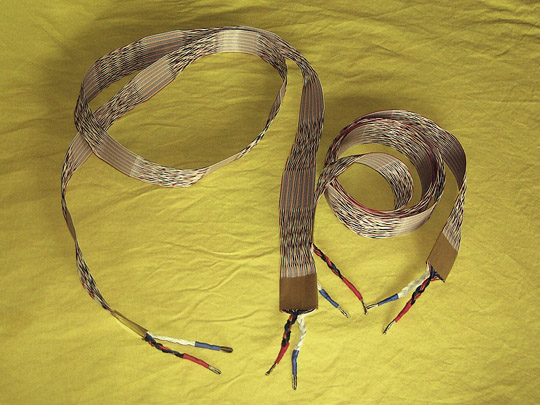
So the finished cables will look like. |
 |
1. Cut the cable approximately 5 mm above a welded segment. This allows better separating of the strands. |
 |
2. Fix the penultimate segment with a good adhesive tape (Tesa), make 2 wraps. This prevents further fanning of the cable. |
 |
3. Separate all cores from each other. |
 |
4. To get a small inductance, you have to collect neighboring cores alternately to the later + - and - pole. I bought a cable in which each second wire had white color. This simplified the task of sorting. All white wires are easily bent back. Later they will form the - pole. |
 |
5. The white wires were bound to a braid and the end was fixed with tape (later removed). I sorted the colored wires by color so it looks nicer. For the electrical characteristics of the finished cable this is irrelevant. |
 |
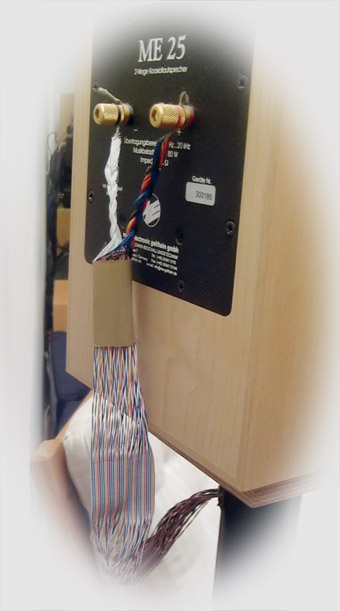
6. Now we got a white braid for the later - pole and a colorful braid for the + pole. |
 |
7. All wires must now be stripped at the free end. Please test first if you have a suitable stripping tool, as with some cables the cores quickly crack. In my case the cable was so sensitive that I had to melt the envelope with the candle flame method. This is best done as follows:
Warning: |
 |
8. Rebuild the braid if necessary. The free strands are twisted together and soldered together only at the end. Cutting off the end with a sharp forceps (shown at the white wire). |
 |
9. Electrical check of the cable. Check passage between the ends of the same color, and also that no short circuit exists between the two strands. |
 |
10. The twisted ends are now halfway bent, so that the end comes to lie in the range that will be protected by the shrink hose later. |
 |
11. Done and also visually appealing – a tail. |

And this is the end result
Links to similar projects
Südwest-LS on krishu.de, he advises not to use wire but cable with solid copper core.
Literature
[1] "Effects of Cable, Loudspeaker, and Amplifier Interactions", J. Audio Eng. Soc., Vol. 39, No. 6, June 1991
The cheapest cable - 36 pole normal flat ribbon cable, interconnected as
above - hit several high-end cables in the electrical values.
